Showing posts with label beauty. Show all posts

Tuesday, January 31, 2012

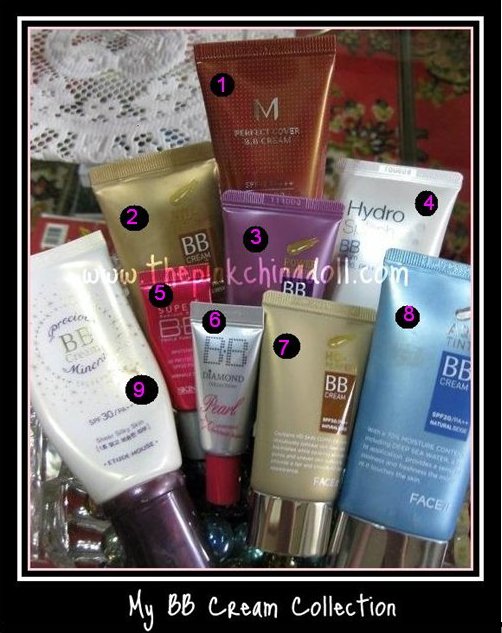
My BB Cream Collection

I am an addict. - A BB Cream Addict! I am head over heels in LOVE with BB Creams mainly because of the benefits it gives my skin unlike with those of liquid foundation, it has a lightweight formula that when applied to skin, it does not feel heavy at all, you don't even have to use a concealer since it does the job perfectly and of course, with continued use, it also has a healing properties that softens and smoothens the skin. It even acts as a sunblock and moisturizer. So why buy different types of products if you can have one product that acts as moisturizer, concealer, sunblock and foundation. 
 ◘ 1. Missha Perfect Cover BB Cream ◘
◘ 2. The Face Shop's Face It - HD Perfect BB Cream ♥ this is my favorite BB cream of all time ◘
◘ 3. The Face Shop's Face It - Power Perfection ◘
◘ 4. The Face Shop's Hydro Splash BB Cream ◘
◘ 5. Skin 79's Super BB Cream ◘
◘ 6. Skin 79's Diamond Pearl BB Cream ◘
◘ 7. The Face Shop's Face It - HD Perfect BB Cream - small size ◘
◘ 8. The Face Shop's Face It - Aqua Tinted BB Cream ◘
◘ 9. Etude House Precious Mineral BB Cream - Sheer Silky ◘

Most of the BB cream brand I use is from The Face Shop, I just love their products that is why I am a regular customer, I never had any allergic reaction or whatsoever that is why I keep on buying and trying out their product, they're all tried and tested. I even use their Shampoo, Conditioner and oh, their curling wax is the best! Which they all deserve a separate reviews. :) 

How bout you, have you tried using BB creams too? Let me know, I would love to try them out too :)


Sweet Day to you All!
Pink Chinadoll

Tuesday, September 20, 2011

Missha Goodies

In my previous post, I mentioned that my sister went out of the country for a short vacation right? But I forgot to tell you the goodies she brought home with her for me. She told me that when she was at a mall she saw a huge Missha store and because she remembered me repeatedly telling her before that I would love to try Missha BB creams because I've been hearing a lot of great reviews about it...she immediately went inside and explored the store...she told me that there were a lot of BB creams to choose from and she didn't know where to start looking hahaha! So anyway dear lovelies, here's the Missha goodies she got for me. :)

Missha Perfect Cover BB cream in No. 23 ♥ The Style Lucid Nail Polish in RD04 ♥ Missha BB Boomer sample ♥ Time Revolution Immortal Youth Serum sample

I will have to try the product first before I do a review for you....I usually try the product for 2-3 months before I could do a review just to make sure the product really works and I usually give my skin the so called " transition/adjustment" period. :)

How bout you Sweeties, have you tried any Missha products already? And if yes, how was it? Please do let me know as I love reading your inputs :)


Sweet Day to you All!
Pink Chinadoll

Saturday, August 27, 2011

Punk Rock Brushies :)

As of last week  (a month now) I am now a proud owner of Charm Travel Pro v3 Brush set. It was really hard for me to decide if I should buy this set instead of The Charm Pro Brush but because of the cute hot pink/black design of the brushes I can't help but give in to temptation. The color combination is really cute it has a girly girl feel but with an edge -  more like a punk rock princess theme. Somehow it reminded me of my very first blog.  That is why I'm calling these babies - Punk Rock Brushies :)


Everybody has a weakness...If Superman's weakness is Kryptonite, I have one too! Chinadoll's weakness is anything P-I-N-K


I might do a review about these brushes but let's see if time permits it. But just to let you all know, these brushes are really worth it and I am loving every single brush in fact I'm using it everyday. The stippling brush is my favorite among all of the brushes and I have been using it to apply BB creams since I'm not into liquid foundation and speaking of BB cream, I have a new favorite BB cream and I would love to tell you all about it...soon. :) 


♥hugs and be safe♥
Sweet Day to you All!
Pink Chinadoll

Saturday, July 9, 2011

The Curly Chinadoll

When I was in grade school my mom would always have my hair permed she said it would make my hair look thick since I have thin hair  and I hated it! And when I say "Hate" I say it conviction, I look hideous and don't ask me for pictures because I will never post any...not in a million years well maybe except for Halloween.

Before I graduated from elementary, finally I had my hair cut and  bid goodbye to curly hair, I even promised my self to never have my hair permed ever again. And boy I was wrong, I started curling my hair again when I started to work but this time not with the old fashioned way of hair perm but with the use of my secret weapon - curling iron. I owned 3 curling irons, two already retired (due to over usage..i guess? lol) and the last one is still with me...still good as new but I have to admit, using curling iron takes a lot of time and it can really damage your hair that is why I also stopped using it.My hair strands are very thin and colored so my hair is really prone to breakage.  I have considered having my hair permed again but I know I will not get that soft bouncy curls via cold wave, the only way to achieve that "to die for curls" is through Digital Perm.

My sister had her Digiperm experience a few months and  I envy her soft bouncy curls. However, it is really expensive it costs her 5000PHP ( approximately $110 - $112). I have been seriously thinking about this for months already and I think my wish was granted. I received a text message from Tony and Jackey stating that they are having a promo for Loreal Digital Perm for 2000PHP (approximately $45) good for 15 days only. Good news right?

 I guess it is time to say....


Did you like it? How about you, do you love curling your hair? Would you consider having a Digital Perm too? Let me know Sweet Loves!

Stay tuned dearies, I might just blog about my digiperm experience in the coming days....


♥hugs and be safe♥
Sweet Day to you All!
Pink Chinadoll

Friday, February 25, 2011

Fresh, Radiant and of course Youthful!

Lately, I've been sporting "Barely there or No Make up" look. It is the most popular look here in Asia and this is a very popular trend with Korean Actresses. Sporting a barely there or no makeup look makes you look fresh, radiant and of course youthful!  


Here are the main products that I use to enhance my features and get that natural glow. :)


1. I apply my day moisturizer first then after 5 minutes I apply the sunscreen and wait for it to dry.
2.  HydroSplash BB Cream from The Face Shop:  Only apply a small amount - pea size is enough for the entire face and neck. Remember a little goes a long way. At first it might make your face a little lighter but don't worry, most BB creams require some time to adjust to your skin tone. Btw, I love this BB cream because it gives you a dewy finish and it's water based. 
3. The Face Shop Finishing Powder in Light Beige: Apply onto the face using a huge Powder Brush. Just make sure you apply only the right amount of powder, we just want to set the BB cream and we want to create a dewy finish.
4. The Face Shop Eyelash Curler: Curl your lashes and apply Mascara. I used Maybelline's Volume Express
5. Redefine your brows. I used Maybelline's Brow Definist
6. TFS Blush in Pink: I am pretty obssessed with pale pink blushes and this blusher gives exactly the natural glow that I'm looking for. This is my new favorite! =)
7.  To finish the whole look, of course do not forget the lipstick! If you want to have that all natural look, you can opt for nude or coral shades. But for a more dramatic look, go for Red lippies. I used Nyx Round Lipstick in Snow White. 

I really don't use concealers because I'm really having trouble looking for the right shade for me. Most concealers appear to be darker than my skin tone so I'm still looking for the perfect one hihihi....but for those who have dark circles around the eye area and if you need to cover some blemishes or dark spots, you need to conceal them first before applying the finishing powder. 

Remember girls, radiant natural beauty never goes out of style. 
P.S. The products in the picture above were all bought by Sweets. Pretty sweet huh? hihihi
Sweet Day to you All!

Pink Chinadoll

Wednesday, February 9, 2011

GlamaDazzle's 200+ followers Giveaway

Hello there Sassy Ladies! Do you want to win lotsa-lotsa Make up worth $1140?! If yes is your answer, then what are you waiting for? Time to join Glamadazzle's 200+ followers giveaway. Joining is easy ladies, just click HERE.

Wish I win this time....I'm drooling already....Goodluck to all who joined the contest!


♥Hugs to you all♥
Pink Chinadoll

Monday, July 26, 2010

Ooohh La La Lashes

The first thing that I look at a person is his/her eyes. You can simply read the person's personality and feelings through his eyes. It is a reflection of what a person feels inside. Since the eyes are the mirror of the soul, why not prettify your eyes!    I have always wanted to have a thick, long and curled eyelashes ---badly! I know that it is almost impossible to grow long eyelashes and too bad, I was not blessed for having a medium length lashes just like my mom's. But thank goodness, I found the perfect solution  Eyelash Extension! 
I asked my good friend, Charlene as to where I could get an eyelash extension. I want mine to be done by experts since our eyes are very sensitive. I asked her if she already heard about iLash Salon. She told me that most of her friends from work go there for extensions and she really recommends the salon. And you know what happened next -- APPOINTMENT!


At the salon.....the application...
At first, they will be asking you what type of extensions do you want. You can choose from Fine Natural and Mascara Effect. For each type, you will also be asked what length you prefer they have: short, medium and long. 
I picked medium length with mascara effect since I am very fond curling my lashes and wearing mascara..this would really save me a lot of time. They will also be asking you to fill out a card for their records and ask you to read the details on how the process works before they let you to go inside the room.


First thing...you have to lie down on their reclining couch (which was very comfy) all throughout the application.  They will ask you to look up so they can apply tape to cover your lower lashes and around the eyes that will serve as their guide before applying the extensions. If you feel any stinging during the process, you have to inform them right away so that they could do some remedy quickly. 
The whole process takes 1 and a half hour to 2 hours for Mascara effect while for the Natural lashes, it would only take an hour.


And while the staff was busy applying the tape, I didn't know that Cha was also busy taking my pictures!


Me and Cha (with her newly treated hair) Look at her smile...she's actually having fun taking pictures without me knowing it! But thanks to her though, I have pictures to post in this entry =)


After the application, you will be advised to not to wet your lashes for 12 hours,   You cannot curl your lashes and even apply mascara. You can still apply eyeliner but make sure to not to use liquid and cream based liners. Anyway, you won't be needing them anymore. ☺ They will also be giving you an After-care instructions on a piece of paper.  You also need to go back every 2 or 3 weeks for touch ups.
The VERDICT
I super L-O-V-E it! The extensions emphasized and opened up my chinita eyes. With these extensions having a long, thick and perfectly curled lashes is very easy.  
I had mine done for only 800 Pesos (about $17.29) instead of a thousand pesos (about $21.61) since they have a 20% promo. Not bad at all!
Even though washing my face takes a lil longer because you really have to be very careful to not let the lashes wet or you can't just simply rub your eyes and you have to be very conscious when sleeping, it still feels great to wake up with beautiful lashes! 
How about you? What are your thoughts about eyelash extensions? If you have tried it, how was it?
Keep on smiling and have a sweet day ya'll!
~ the Pink Chinadoll


Wednesday, June 16, 2010

Nail Art for Beginners: Pink and Black combo


Beautiful day everyone! Most of you already know that I love wearing nail colors and to further enhance my addiction to nail polishes, I am now learning how to do nail arts. I've been watching youtube videos and reading blogs for nail art tutorial. It doesn't really require you to have a steady hands, practice is all you need my friend! Anyway, I would like to show you how to do a simple nail art design just like the picture below, this is for beginners like me.


First and foremost, apply a base coat to protect your nails from getting all yellowish. I used TFS's Nail Strengthener.


Apply your base color. I want to create a gothic but chic and sassy look so I came up with a Pink and Black Combo. I used Caronia's Claret for the Pink and Caronia's Black Velvet. The shade of Claret is a bit darker than the usual Hot Pink. But of course, you can use any shade of pink preferably neon pink or hot pink but I would discourage you from using any light pink and baby pink shades since the color won't turn out great, remember we want a bit of goth. =) Then let it dry. You have to make sure that the nails are really, really dry.

Then get a tape, you can either use a scotch tape or masking tape. Then stick it to your nail as a guide to create a straight diagonal line like this:


Get your black nail polish and apply the polish from the masking tape to the tip of your nails. It should look like this: (I'm still waiting for the nail polish in my middle finger to dry before I could stick the masking tape).


Gently remove the masking tape. No need to wait for the polish to dry, just remember to take it off slowly.


  To add more design, if you have a dotting tool you can add 3 pink dots on the black part of your nails, it is up to you on how you want the dots to appear. As for me, I want it in a slant position. Sweethearts, you can be resourceful too! If you do not have any dotting tool, you could use ballpen, toothpick or just about anything with a sharp tip. I couldn't find any ballpen when I was doing the design and I saw my eyeshadow's sponge applicator so I just used the tip to dot. (I'm not using it anyway..hahaha!)


 Lastly, once the dots are all dry, seal the design with a clear base or top coat. I used TFS's Top Coat. Just let it dry and you're done! 


 I hope you liked my simple nail art tutorial, this is really easy...try it guys!

Keep on smiling and have a sweet day to you all!
~ The Pink Chinadoll♥♥♥


Thursday, June 3, 2010

My Nail Care Routine


Every girl wants to have posh nails. And in order for us to do that, we have to learn how to properly care for our nails. I have always been a Nail Color addict, I regularly change my nail color every 2 weeks. For me, having a fab nails boosts my self confidence. Well, who amoung us doesn't feel good when we have a great set of nails to show off? In this entry I will be sharing my ways on how to care for those gorgeous nails. Remember: Beautiful natural looking nails require care, proper ways of manicuring and of course TLC♥

A shortish nail that is straight across the top with rounded edges is the current in style shape. The general rule of thumb is to keep the free edge of the nail (white tip) no longer than half the length of the nail bed which is the pinkish part. For those who want longer nails, nail hardener with nylon fibers is very useful in minimizing breaks.

Here are some tips on how to care for your nails:

♪  Clean and Polish free Nails.  First step is to make sure that your nails are free from any nail color. If you have nail polish on, make sure you remove it first. Use a cottonball and a nail polish remover, then press over the nails for a few seconds before you rub, it will soften the nail color and it would be much easier to remove. And please do not use Acetone, this would make your nails dry and brittle. As for me I've been using TFS Nail Enamel Remover in Pink.

Next, wash your hands thoroughly. Use a brush or a toothbrush to gently scrub away stubborn dirt under the nails. But, of course you have to use a different toothbrush from the one that you actually use to brush your teeth on...that's ewwwiiieee...disgusting hahaha).          

♪  File.  File each nail tip from corner to center. Do not file back and forth or in a "see-saw" motion as this weaken the nails which would cause ridges and splitting.

♪ Buff. Do not forget to buff your nails to give them a shinier look. Start at the cuticle down to the tip but please make sure that you do not put too much pressure and do not use back and forth motion.

♪ Cuticle. This one is really optional, I normally do not do this since I have a sensitive skin and leaving the cuticle could also prevent infections. But if you still would want to work on this, just make sure that you do not cut the cuticles or push them back too much. Hey our fingers needs protection too you know! ☺

Now that your nails are clean, here comes the exciting part, you are now ready to apply Nail Colors! Agree?

I'm wearing Blue and Stars today, well that is what I call the design. ☺

♫  Base Coat. Always apply a base coat to help keep the nail polish from chipping and to make it last longer. You can use any clear polish (top coat) or Nail strenghtener. Make sure to let it dry before applying nail polish.

Nail Strengthener - The Face Shop

♫  Apply Polish. Apply two coats of nail polish. You should be able to cover the nail in just three strokes, one on each side and then one in the middle. Make sure that the polish is dry before you apply another coat.
 
Sorry it looks a bit messy. I haven't cleaned the sides of the skin yet. ☺
Elianto's Blue Splash

Always allow your polish to dry thoroughly for several minutes before you apply the next coat. This will avoid the new coat from dragging on the surface of the previous coat and allow the next layer adhere better. Darker shades take longer to dry. Avoid fast drying polish. It does not last as long.

To add more spice, I applied 2 coats of TFS's Nail Color in PK107.

♫ Top Coat. Once your nail polish has dried, apply a clear Top Coat to seal it. Continue to apply the Top Coat daily to keep nails looking fresher longer.

And now were done! Here it is. Beauties, again forgive my messy nails. I was in a hurry and I didn't have enough time to clean the sides, I know its unforgivable but I know you love me. ☺☺☺


Products used:  PK107-TFS, Blue Splash-Elianto, Nail Strengthener-TFS and Top Coat-TFS.

So there, that is all you need to do to have a beautiful and natural looking nails. By the way, you can keep the nail polish on for about two weeks. How about you guys what are your beauty tips to keep your nails healthy and beautiful? Before I go, leave me leave you with some pictures of my favorite nail polish colors and design.


  Keep on Smiling Everyone!
♥Have a SweetDay to ya'll

   ~ Miss PinkChinadoll

Wednesday, April 14, 2010

Let's go Organic!

Aside from being addicted to Make Ups, I’m also a sucker for skin care products, particularly Bath Soaps. It is very important that we keep our skin healthy for many reasons; our skin is the largest organ in our body and it is our body’s first line of defense against diseases, infection and other health problems. The sad part is that most of us ignore it, we cause it harm buy using products that contains harsh ingredients and chemicals that leads to further skin damage.

Do you want to know how to have a soft and smooth skin like me? (forgive me guys, anyway I am the owner :P) Okay, here’s my secret --> Organic Soap. Soaps have a lot of benefits but these are only effective if you choose the right kind of soap for you. Commercial soaps are not really safe for the skin as they claim to be. Try to assess your skin after having a shower, most of the time your skin feels dry and stretched. Most of these commercially produced soaps are made out of synthetic chemicals that cause our skin to become dry and even cause allergies. If you want to have a beautiful and healthy skin, it would be better for you to switch to organic soaps. This kind of soap only contains natural ingredients and does not contain any harsh or harmful substances. Ingredients used are also grown organically which means that they have been produced without using herbicides, chemical fertilizers or even pesticides.

When you are shopping for organic products, I suggest you to do some research first; you have to review the labels for the organic and natural ingredients. As for me, I am a huge fan of All Organics, this is where I buy my bath soaps and I highly recommend their products. Their soaps are all handmade and are specially formulated to deliver the very best in skin care while using only safe, truly natural ingredients. Their products contain no harmful preservatives and chemicals such as parabens, mineral oil, paraffin, petrolatum, phenol carbolic acid, propylene glycol, acrylamide, toluene, dioxane, sulfates, triclosan, triclocarban, EDTA, TEA, DEA, sodium laureth and sodium lauryl sulfates (SLS/SLES).

Here are my orders, I ordered 5 Goat's Milk Honey Oatmeal soap, this is my all time favorite, and it best suits my sensitive skin giving it, a soft and silky smooth squeaky clean and moisturized feeling, it smells good too! I also got 10 free Milea Mineral Make up samples and a free “Rescue in a Bottle.” Thank you so much Ms. Eds for the freebie, I am very happy with the service and I will be buying more from you soon =)

Guys, if you want to try their products, you may visit them at http://www.allorganics.com.ph/ and http://www.miletnbea.multiply.com/.

Loves, when you're going green by purchasing organic soap and other products for your family, you are also protecting the environment. Organic ingredients are traditionally grown without the use of chemicals, including pesticides that pollute our air, run into our water supplies, and become embedded in our soil. Instead, organic ingredients are harvested in a way that is actually beneficial to our entire ecosystem. Let us support the environment as well as the products that are 100% Philippine made. Let’s go Organic!

 Sweet Day to ya'll
 ~Miss PinkChinadoll

Wednesday, March 31, 2010

Hi, I am ChinaDoll and I am an Addict!

Bee~you~tee~full Morning Loves! =) It's been a while since I last updated my blog...I'm sorry I know I've been such a lazy and lousy blogger. And I just realized that it has been a year since my last update soooo it's about time to update you with all the things that kept me busy.

I never liked make up...Until I met Ricebunny a.k.a. Michelle PhanFor those who don't know her, she is a young make up artist who does online make up tutorials via YouTube. Just by watching her videos, little by little I'm starting to learn a lot things...Make up actually does a lot of things not just for making us Ladies Beautiful but it also helps us improve our confidence and self esteem. 


If you would like to learn more, just visit the links under "I ♥ Online Shopping" link at the side bar of this blog, some of the sites even have tutorials on how to properly apply make up, how to determine which type of skin tone and undertone you have and so much more...plus, you can also check out the stuff they sell, some products are of quality and way cheaper than the ones in the malls =)

So for all the ladies out there who would like to "exude the beauty in you" join me in learning more ideas and tricks and unleash our creativity specially in accentuating our inner and natural beauty.


Sweet Day to ya'll
 ~Miss PinkChinadoll

PinkChinadoll's bookshelf: read

Up to Me
Wallbanger
Wanted
The Secret of Ella and Micha
The Marriage Mistake
The Marriage Trap
Fallen Too Far
Unlikely Allies
Ride with Me
Graffiti Moon
Teach Me
Almost
Graffiti Moon
Love's Rhythm
The Edge of Never
My Life Next Door
Hopeless
The Marriage Bargain
The Statistical Probability of Love at First Sight
Losing It


PinkChinadoll's favorite books »